If your shear is not cutting cleanly or straight, it could mean that your shear is out of alignment or not properly lubricated.
Note: The shear is extremely dangerous and can cause serious bodily injury or death. For this reason, the machine is provided with a guard to prevent the operator from reaching into the shear. It is crucial that the guard remains in place at all times when the machine is in operation. The guard should only be removed for maintenance and adjustment of the shear when the machine is unplugged/unpowered or locked out/tagged out.
Learn more about common problems and solutions for portable roof panel machines in this article.
Watch this video to learn more about the shear on your machine
How to Fix Shear Alignment
If you notice any of these things happening when operating your machine and shear, this could mean your shear is out of alignment:
- The shear is cutting the metal unevenly or jaggedly.
- The cut panel is getting caught on or hitting the exit shear die.
- A worn out center mandrel.
- A broken shear die.
There is more than one way to fix the problems you might be experiencing with the shear. Below are some common ways to fix shear misalignment.
How to Adjust the Entry and Exit Shear Dies
The Entry and Exit Shear Dies are specific to each roller set and may need to be changed when changing profiles. The Dies must be adjusted to the proper distance from the vertical legs of the panel. The outside vertical leg of the male and female Entry Dies should be approximately 1/32” away from the outside of the vertical legs of the panel. The Exit Dies should be positioned slightly to the outside of the male and female Entry Dies so that after a cut is made, the panel does not get hung up on the Exit Dies.
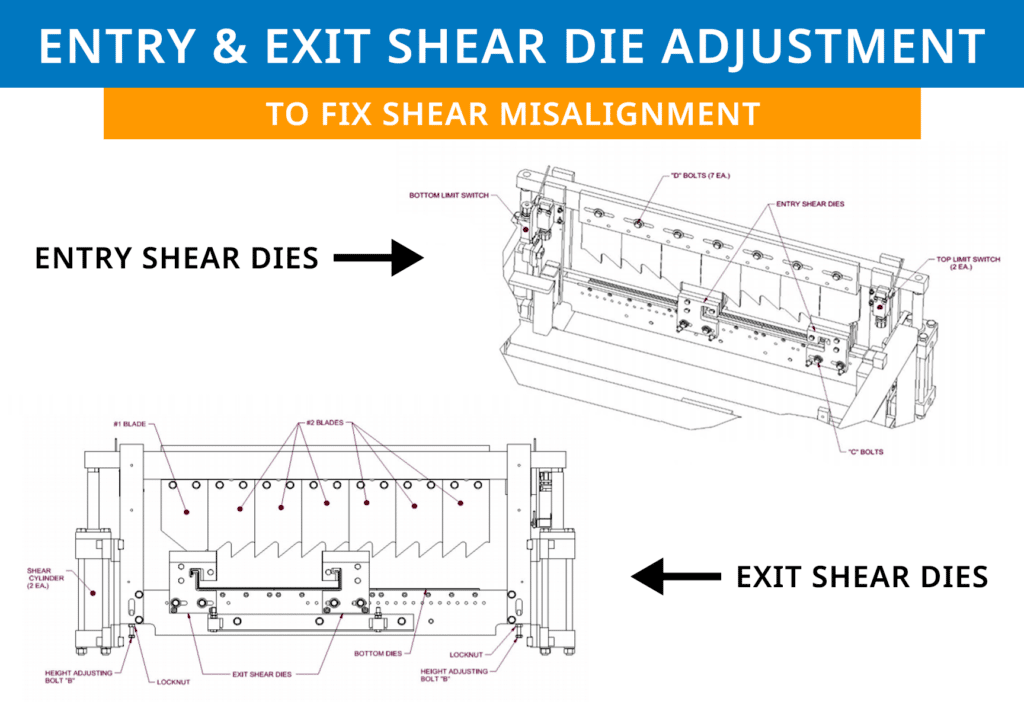
Follow this procedure to make the adjustments (see right drawing to follow along):
Entry & Exit Shear Die Adjustments
- Run material through the machine until it is about six (6) inches away from the shear, then shut off the machine and disconnect the power.
- Sight down the legs of the panel to find the approximate location to install the Entry Shear Dies. Hold them in place with the “C” bolts but do not tighten them yet.
- Start up the machine and carefully jog the material forward while looking through the dies. If it seems like the panel will hit the dies, shut off the machine and disconnect the power. Then, further adjust the dies as necessary until the panel goes through cleanly.
- Continue jogging the panel forward until it is about an inch or two past the shear dies, then shut off the machine and disconnect power.
- Adjust the Entry Shear Dies until they are about 1/32” away from the outside of the vertical leg of the panel. Each profile will look different, so make sure to reference your manual to see how it is shown. Tighten the “C” bolts.
- If the Entry Shear Die has a Mandrel, it should be positioned as shown in the figure for your panel. If necessary, loosen the “E” bolts and adjust the Mandrels. Retighten the “E” bolts.
- Install the Exit Shear Dies and adjust them so they are about 1/32” to the outboard of the Entry Shear Dies, as shown in the figure for your panel. Tighten the “C” bolts.
- Adjust the Mandrel on the Exit Shear Die as needed, if it has one.
Blade Adjustments
- To cut properly, the Top Blades need to be positioned so that one of the #2 Blade tips is just to the inside of the male leg, as shown in the photo. Also, the tip of the #1 Blade is positioned to the inside of the female leg. The rake or angle of the blades should cut in a scissor action outward against the legs. If necessary, loosen the seven “D” bolts and move the Top Blades left or right to get them in the correct position. Retighten the bolts.
- Start the machine and shear off a panel about 12 inches long, then jog the material forward a few inches. Make sure the panel is not scraping on the shear dies and inspect the quality of the cut on both sides. If any corrections need to be made, shut off the machine and disconnect the power, then adjust the shear dies.
Maintaining the Shear
Clean and lubricate the Top Blades, Bottom Dies, and Male/Female Dies approximately every 30 cuts during regular use, or whenever cutting surfaces look dry. Proper lubrication is essential to clean cuts, rust prevention, and longevity of the shear.
We recommend Super Lube® Multi-Purpose Synthetic Lubricant as a shear lubricant (it’s also available to purchase through New Tech Machinery). DO NOT use WD-40 to lubricate your shear.
Watch this video to learn about machine maintenance including shear lubrication: